Introduction – Install Nginx PHP MySQL on Ubuntu 22.04
“LEMP” stack is a very popular word nowadays and it just means – Linux (Ubuntu comes under this), pronounced as engine-x, hence the E in the acronym NGNIX, MySQL, and PHP. All of these are open-source software and are installed together in order to enable a web server to host PHP-based web applications and dynamic websites (based on WordPress CMS etc).
By the end of this tutorial, you’ll be able to set up a LEMP stack on an Ubuntu 22.04 machine.
If you don’t have an Ubuntu machine, you can try DigitalOcean to get a machine (or VPS), popularly known as DROPLET in the DigitalOcean community. Signup DigitalOcean using this link and get $100 worth of credits for FREE.
Prerequisites
In order to complete this tutorial, you have to have an Ubuntu 22.04 server with a sudo-enabled user account.
Step 1 — Installing Apache and Updating the Firewall
The Apache web server is popularly used, well documented, and has an active community of users.
We will start by updating the package manager cache of our Ubuntu system.
sudo apt-get update
After this, we’ll install Apache by running the following command in our terminal:
sudo apt-get install nginx
Please confirm Apache’s installation by pressing Y, then ENTER.
After this is done, we need to adjust the firewall settings by running the following commands:
sudo ufw app list
sudo ufw allow in "Nginx HTTP"
sudo ufw allow in "Nginx HTTPS"
Explaining these commands in detail doesn’t make much sense here. If you’re interested, please use Google search. 🙂
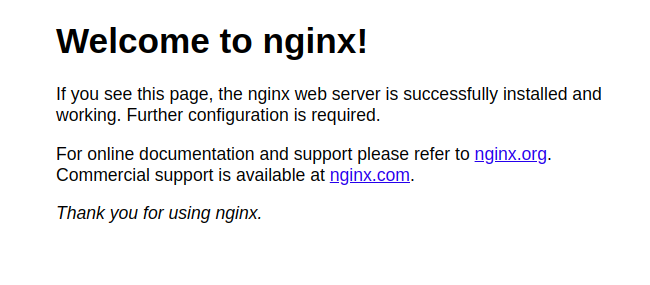
Now Nginx is installed, you can confirm this by visiting:
http://your_server_ip
You should see Nginx’s default page like the below screenshot:
Step 2 — Installing MySQL
sudo apt-get install mysql-server
When you’re finished, test whether you’re able to log in to the MySQL console by typing:
sudo mysql
In order to exit the MySQL console, type exit:
exit
Step 3 — Installing PHP
In order to install the latest PHP and all the related packages, please run the following command:
sudo apt update
sudo apt install software-properties-common
sudo add-apt-repository ppa:ondrej/php
sudo apt update
sudo apt install php8.3-fpm php8.3-mysql
sudo apt install php-mysql php-curl php-xml php-gd mysql-client zip unzip php-zip php-imap
sudo apt install php-json php-mbstring php-bcmath
After this, restart Nginx
sudo systemctl reload nginx
Step 4 (Optional) — Configuring Nginx to Use the PHP Processor
Open a new configuration file in Nginx’s sites-available directory using your preferred command-line editor. Here, we’ll use nano:
sudo nano /etc/nginx/sites-available/your_domain
This will create a new blank file. Below is the code which we use for our WordPress websites. This fixes the permalinks issues, which will be there as Nginx doesn’t support the .htaccess file.
server {
 listen 443;
 server_name yourdomain.com www.yourdomain.com;
 root /var/www/html;
 index index.html index.htm index.php;
 ssl on;
 ssl_certificate /var/www/keys/namecheap/nginx_bundle_11111.crt;
 ssl_certificate_key //var/www/keys/yourdomain.com.key;

 ssl_prefer_server_ciphers on;
 ssl_protocols TLSv1 TLSv1.1 TLSv1.2;
 ssl_ciphers 'EECDH+AESGCM:EDH+AESGCM:AES256+EECDH:AES256+EDH';

    location / {
        try_files $uri $uri/ /index.php?$args;

    }

    location ~ \.php$ {
        include snippets/fastcgi-php.conf;
        fastcgi_pass unix:/var/run/php/php8.1-fpm.sock;
     }

    location ~ /\.ht {
        deny all;
    }

}

server {
    listen 80;
    server_name yourdomain.com;
    return 301 https://$host$request_uri;
}
In this file, the .crt is not the file that we got from Namecheap/Comodo after verification of our domain. To get the .crt file which we need to put here, the steps are:
1. Go here: https://decoder.link/result
2. Paste the contents of the .crt file you received from Namecheap/Comodo in your email after verification of your domain.
3. Now click on the Decode button
4. Scroll down to find the “Bundle (Nginx)” line and click the download button next to it.
5. Put the downloaded file in your server and then paste its path into the above Nginx config file.
Verify the installation of your SSL on the below-mentioned URL:
https://decoder.link/sslchecker/yourdomain.com/443
https://www.sslshopper.com/ssl-checker.html?hostname=yourdomain.com
Activate your configuration by linking to the configuration file from Nginx’s sites-enabled directory:
sudo ln -s /etc/nginx/sites-available/your_domain /etc/nginx/sites-enabled/
Then, unlink the default configuration file from the /sites-enabled/ directory:
sudo unlink /etc/nginx/sites-enabled/default
This will tell Nginx to use the configuration the next time it is reloaded. You can test your configuration for syntax errors by running the following:
sudo nginx -t
If any errors are reported, go back to your configuration file to review its contents before continuing. When you are ready, reload Nginx to apply the changes:
sudo systemctl reload nginx
Step 5 (Optional) — Setting up SWAP memory
We’ll run the following commands to setup SWAP memory of 2GB:
sudo fallocate -l 2G /swapfile
sudo chmod 600 /swapfile
sudo mkswap /swapfile
sudo swapon /swapfile
echo '/swapfile none swap sw 0 0' | sudo tee -a /etc/fstab
Now we need to add 2 parameters in sysctl.conf file.
In order to do this, run the following commands:
sudo nano /etc/sysctl.conf
And add the following 2 lines at the end of the sysctl.conf file:
vm.swappiness=10
vm.vfs_cache_pressure=50
Press control+x and they Y to save and exit.
Run the following command to confirm the successful SWAP file creation:
free -h
That’s it.
Step 6 (Optional) — Setting up proper permissions
In order to set up proper permissions for your /var/www/html folder, just run the following 2 commands:
sudo usermod -aG www-data $USER
sudo chown -R www-data:www-data /var/www
Step 7 (Optional) — Basic commands for creating a database, a user, and giving it permission to access it.
Let’s login to MySQL first:
mysql -u root -p
Enter your password and then in order to create a database “testdb”, run the following command:
create database testdb;
Now we’ll create a user “dbuser” with password “dbuserpass” which will access this database from “192.1.2.50” server to access testdb which we created above :
CREATE USER 'dbuser'@'192.1.2.50' IDENTIFIED BY 'dbuserpass';
GRANT ALL PRIVILEGES ON testdb.* TO 'dbuser' @'192.1.2.50';
FLUSH PRIVILEGES;
That’s it.
Step 8 (Optional) — Setup Memcached cache software
Just run the following 2 commands:
sudo apt install memcached libmemcached-tools -y
sudo apt install php-memcached
Step 9 (Fixing WordPress Permalinks Issue)
location / {
try_files $uri $uri/ /index.php?$args;
}
This completes the tutorial to set up your Ubuntu 22.04 server with Nginx, MySQL, and PHP. If you need any help (paid) in setting up WordPress or with Nginx then feel free to drop an email to support@ommune.com and our team will be happy to help!
php.ini path in NGINX: /etc/php/8.3/fpm
After making the changes, restart using:
sudo systemctl restart php8.3-fpm
sudo apt install php-mysql php-curl php-xml php-gd mysql-client zip unzip php-zip php-imap
sudo apt install php-json php-mbstring php-bcmath
# Install prerequisites
sudo apt-get install php-dev php-pear libmcrypt-dev gcc make autoconf libc-dev pkg-config
# Compile mcrypt extension sudo pecl install mcrypt
# Just press enter when it asks about libmcrypt prefix
# Enable extension for apache
echo “extension=mcrypt.so” | sudo tee -a /etc/php/8.3/apache2/conf.d/mcrypt.ini
echo “extension=mcrypt.so” | sudo tee -a /etc/php/8.3/fpm/conf.d/mcrypt.ini
sudo snap install core; sudo snap refresh core
sudo snap install –classic certbot
sudo ln -s /snap/bin/certbot /usr/bin/certbot
sudo certbot –nginx -d example.com -d http://www.example.com